I plan to start writing a series of MySQL blogs that will dive deep into MySQL’s design and implementation from the perspective of its underlying code. The prefix of this series will be called “Deep Dive into MySQL.” Through this series, I aim to review and organize my knowledges of MySQL implementation through blogging, while also helping those who want to know about and understand the inner workings of MySQL. This series will focus on introducing the underlying implementation of InnoDB and NDB storage engines.
Let’s start with the first post by focusing on InnoDB! This post will introduce the transaction lock system in InnoDB, specifically how InnoDB handles row-level locking in transactions. This is a broad topic and will be divided into multiple blog posts. In this post, I’ll cover the necessary background information and the locking process during INSERT operations in InnoDB.
Roadmap:
- This post: The locking process during INSERT operations
- Next post: The locking process in Locking Reads
- Following post: The implementation of MVCC
Assumptions for this post:
- Code version: MySQL 8.0.35
- Isolation level: Repeatable Read (Read Committed is much simpler and won’t be covered here).
Table of Contents:
- Lock vs. Latch
- Repeatable Read
- Lock Modes
- Locking Process in Insert Operations
- Performance Issues in the Current Implementation
1. Lock vs. Latch
In InnoDB, a lock is placed on records accessed or modified in a transaction and is typically released when the transaction is committed or rolled back. A latch, on the other hand, is a lock on the BTree pages when locating records in the BTree. It’s released after locking the corresponding record and completing the access or modification. The scope of a latch is much smaller compared to a lock. In the actual implementation, a large transaction is broken down into several mini-transactions (mtr). For example, as shown in the diagram, a transaction performing an insert, a select…for update, and an update corresponds to three mini-transactions (simplified for clarity; there are usually more). Each mini-transaction follows these steps:
- Locate the target record in the BTree and lock the relevant page latch.
- Lock the target record and modify the corresponding record.
- Release the page latch.
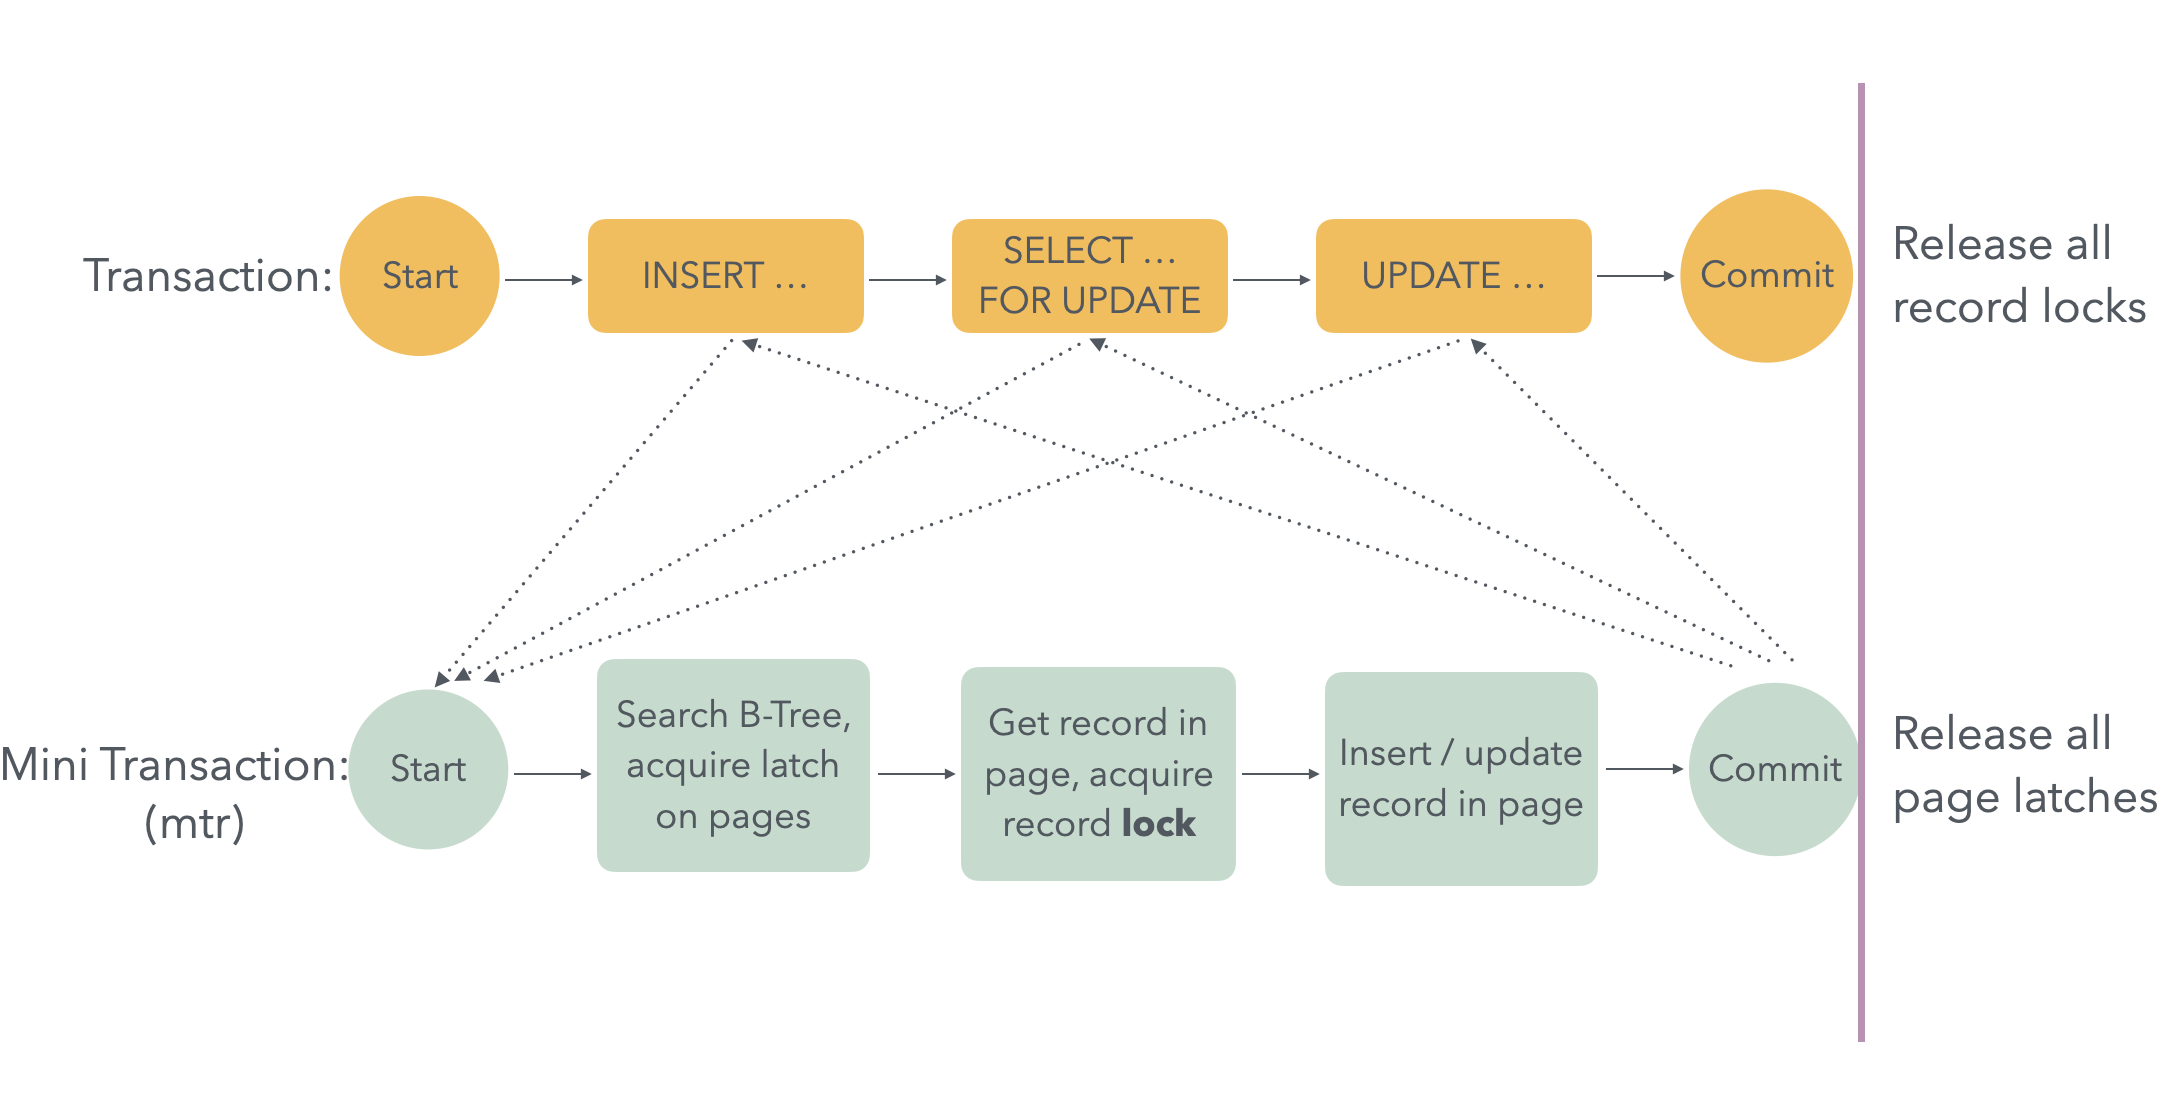
Why is this done? It’s for concurrency. Once the second step is completed in each operation, the target record is protected by a lock, preventing other concurrent transactions from modifying it. Therefore, there’s no need to continue holding the page latch for the record. Otherwise, if another transaction tries to access/modify a different record on the same page, which could otherwise be done concurrently, it would be blocked by the page latch.
The lock is stored in lock_sys->rec_hash, and each record lock is identified in rec_hash by <space_id, page_no, heap_no>.
The latch is stored in the block corresponding to the page in the buffer pool and is located at block->lock.
This post will only focus on locks, and I’ll cover latches in a separate post.
2. Repeatable Read
As the name suggests, RR ensures that repeated execution of the same SELECT...FOR UPDATE in a transaction will return the same result set (except for modifications made by the current transaction). This means that no other transaction should be able to insert new records within the range of the SELECT. InnoDB implements this by locking not only the records that meet the condition but also the range around them to prevent inserts by other transactions.
InnoDB doesn’t lock a specified range with a single lock; instead, it splits the range and places locks on the existing records within the range. This introduces the concepts of Gap Lock and Next-key Lock, which are applied to specific records:
- A Gap Lock protects the open range between the current record and the previous one.
- A Next-key Lock protects the half-open interval including the current record and the gap before it.
Both types of locks prevent other transactions from inserting new records into the range, ensuring Repeatable Read.
3. Lock Modes
The main lock modes are Shared (S) and Exclusive (X) locks (represented in code by LOCK_S and LOCK_X).
The main gap lock modes are Record Lock, Gap Lock, and Next-key Lock (represented in code by LOCK_REC_NOT_GAP, LOCK_GAP, LOCK_ORDINARY).
In practice, the combination of mode | gap_mode determines the actual type of lock. A Record Lock is applied to a single record, while Gap Lock and Next-key Lock are used to prevent other concurrent transactions from inserting into the gap before the locked record.
To handle this, InnoDB introduces an Insert Intention Lock, which is an actual type of lock represented by:
(LOCK_X | LOCK_GAP | LOCK_INSERT_INTENTION)
It is mutually exclusive with Gap Lock and Next-key Lock. When attempting to insert, if a lock exists on the next record, the transaction will try to acquire an Insert Intention Lock on that record, indicating its intent to insert a new record in the gap. If another transaction holds a Gap/Next-key Lock on the same range, the Insert Intention Lock will wait until the other transaction commits.
The specific lock conflict detection happens in the lock_rec_has_to_wait() function. The general principle is to check whether the two locks are compatible by first checking for a conflict in the lock mode:
rec_lock_check_conflict()
| LOCK_S | LOCK_X | |
|---|---|---|
| LOCK_S | O | X |
| LOCK_X | X | X |
If there’s no conflict, the locks are considered compatible, and no waiting is needed. If there is a conflict, a gap mode exception check is performed, as summarized below:
| LOCK_ORDINARY | LOCK_GAP | LOCK_GAP | LOCK_INSERT_INTENTION | LOCK_REC_NOT_GAP | |
|---|---|---|---|---|
| LOCK_ORDINARY | X | O | O | X |
| LOCK_GAP | O | O | O | O |
| LOCK_GAP | LOCK_INSERT_INTENTION | X | X | O | O |
| LOCK_REC_NOT_GAP | X | O | O | X |
If there’s no conflict in the gap mode, the locks are considered compatible, and no waiting is needed. From this table, you can see:
- Insert Intention Locks must wait for Gap Locks and Next-key Locks.
- No lock needs to wait for Insert Intention Locks.
- Gap Locks don’t wait for any locks.
- Next-key Locks wait for other Next-key Locks and Record Locks, and vice versa.
With these lock compatibility principles in mind, we can now look at how they are used in the actual Insert process.
3. Insert Locking Process
3.1 Code Implementation
The code implementation of Insert can be found in the row_ins() function, which specifically includes:
- First, insert into the primary index, corresponding to the function
row_ins_clust_index_entry_low(). - Then, insert into each secondary index in sequence, corresponding to the function
row_sec_clust_index_entry_low().
Here, I have excluded other parts and focused mainly on the locking process in the Insert operation. I’ve created two diagrams to illustrate the principles and details of locking when inserting into the primary and secondary indexes.
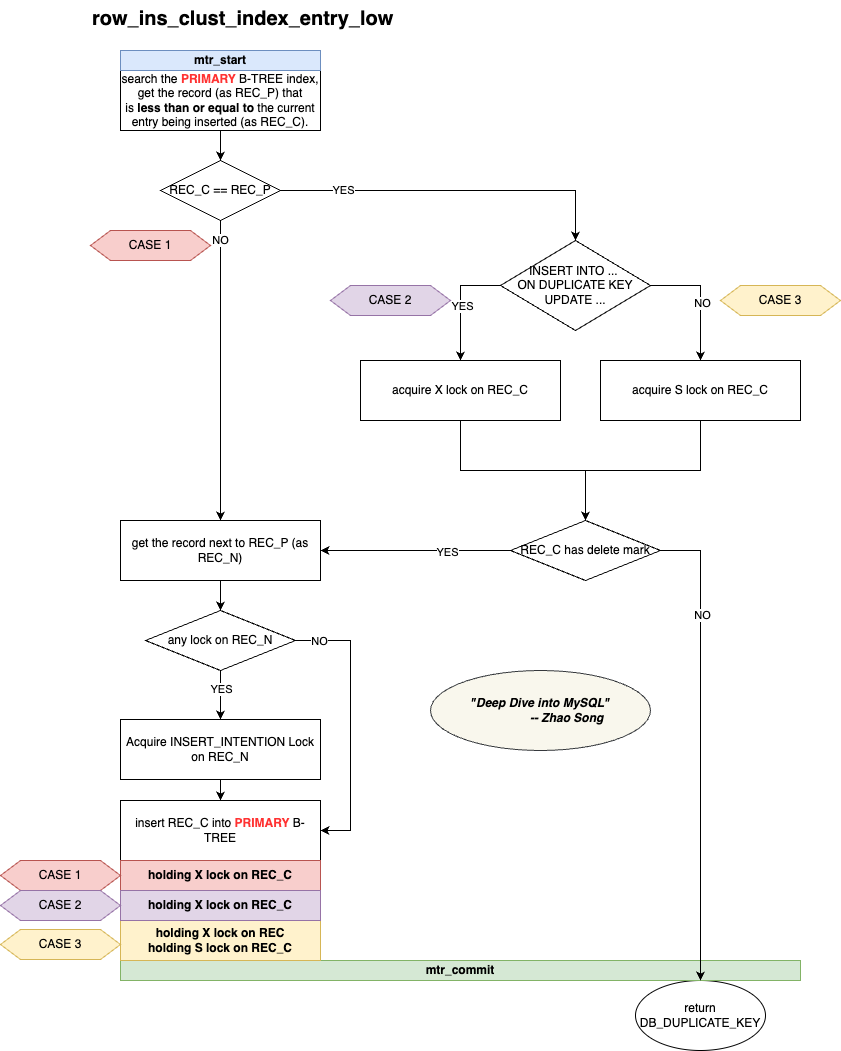
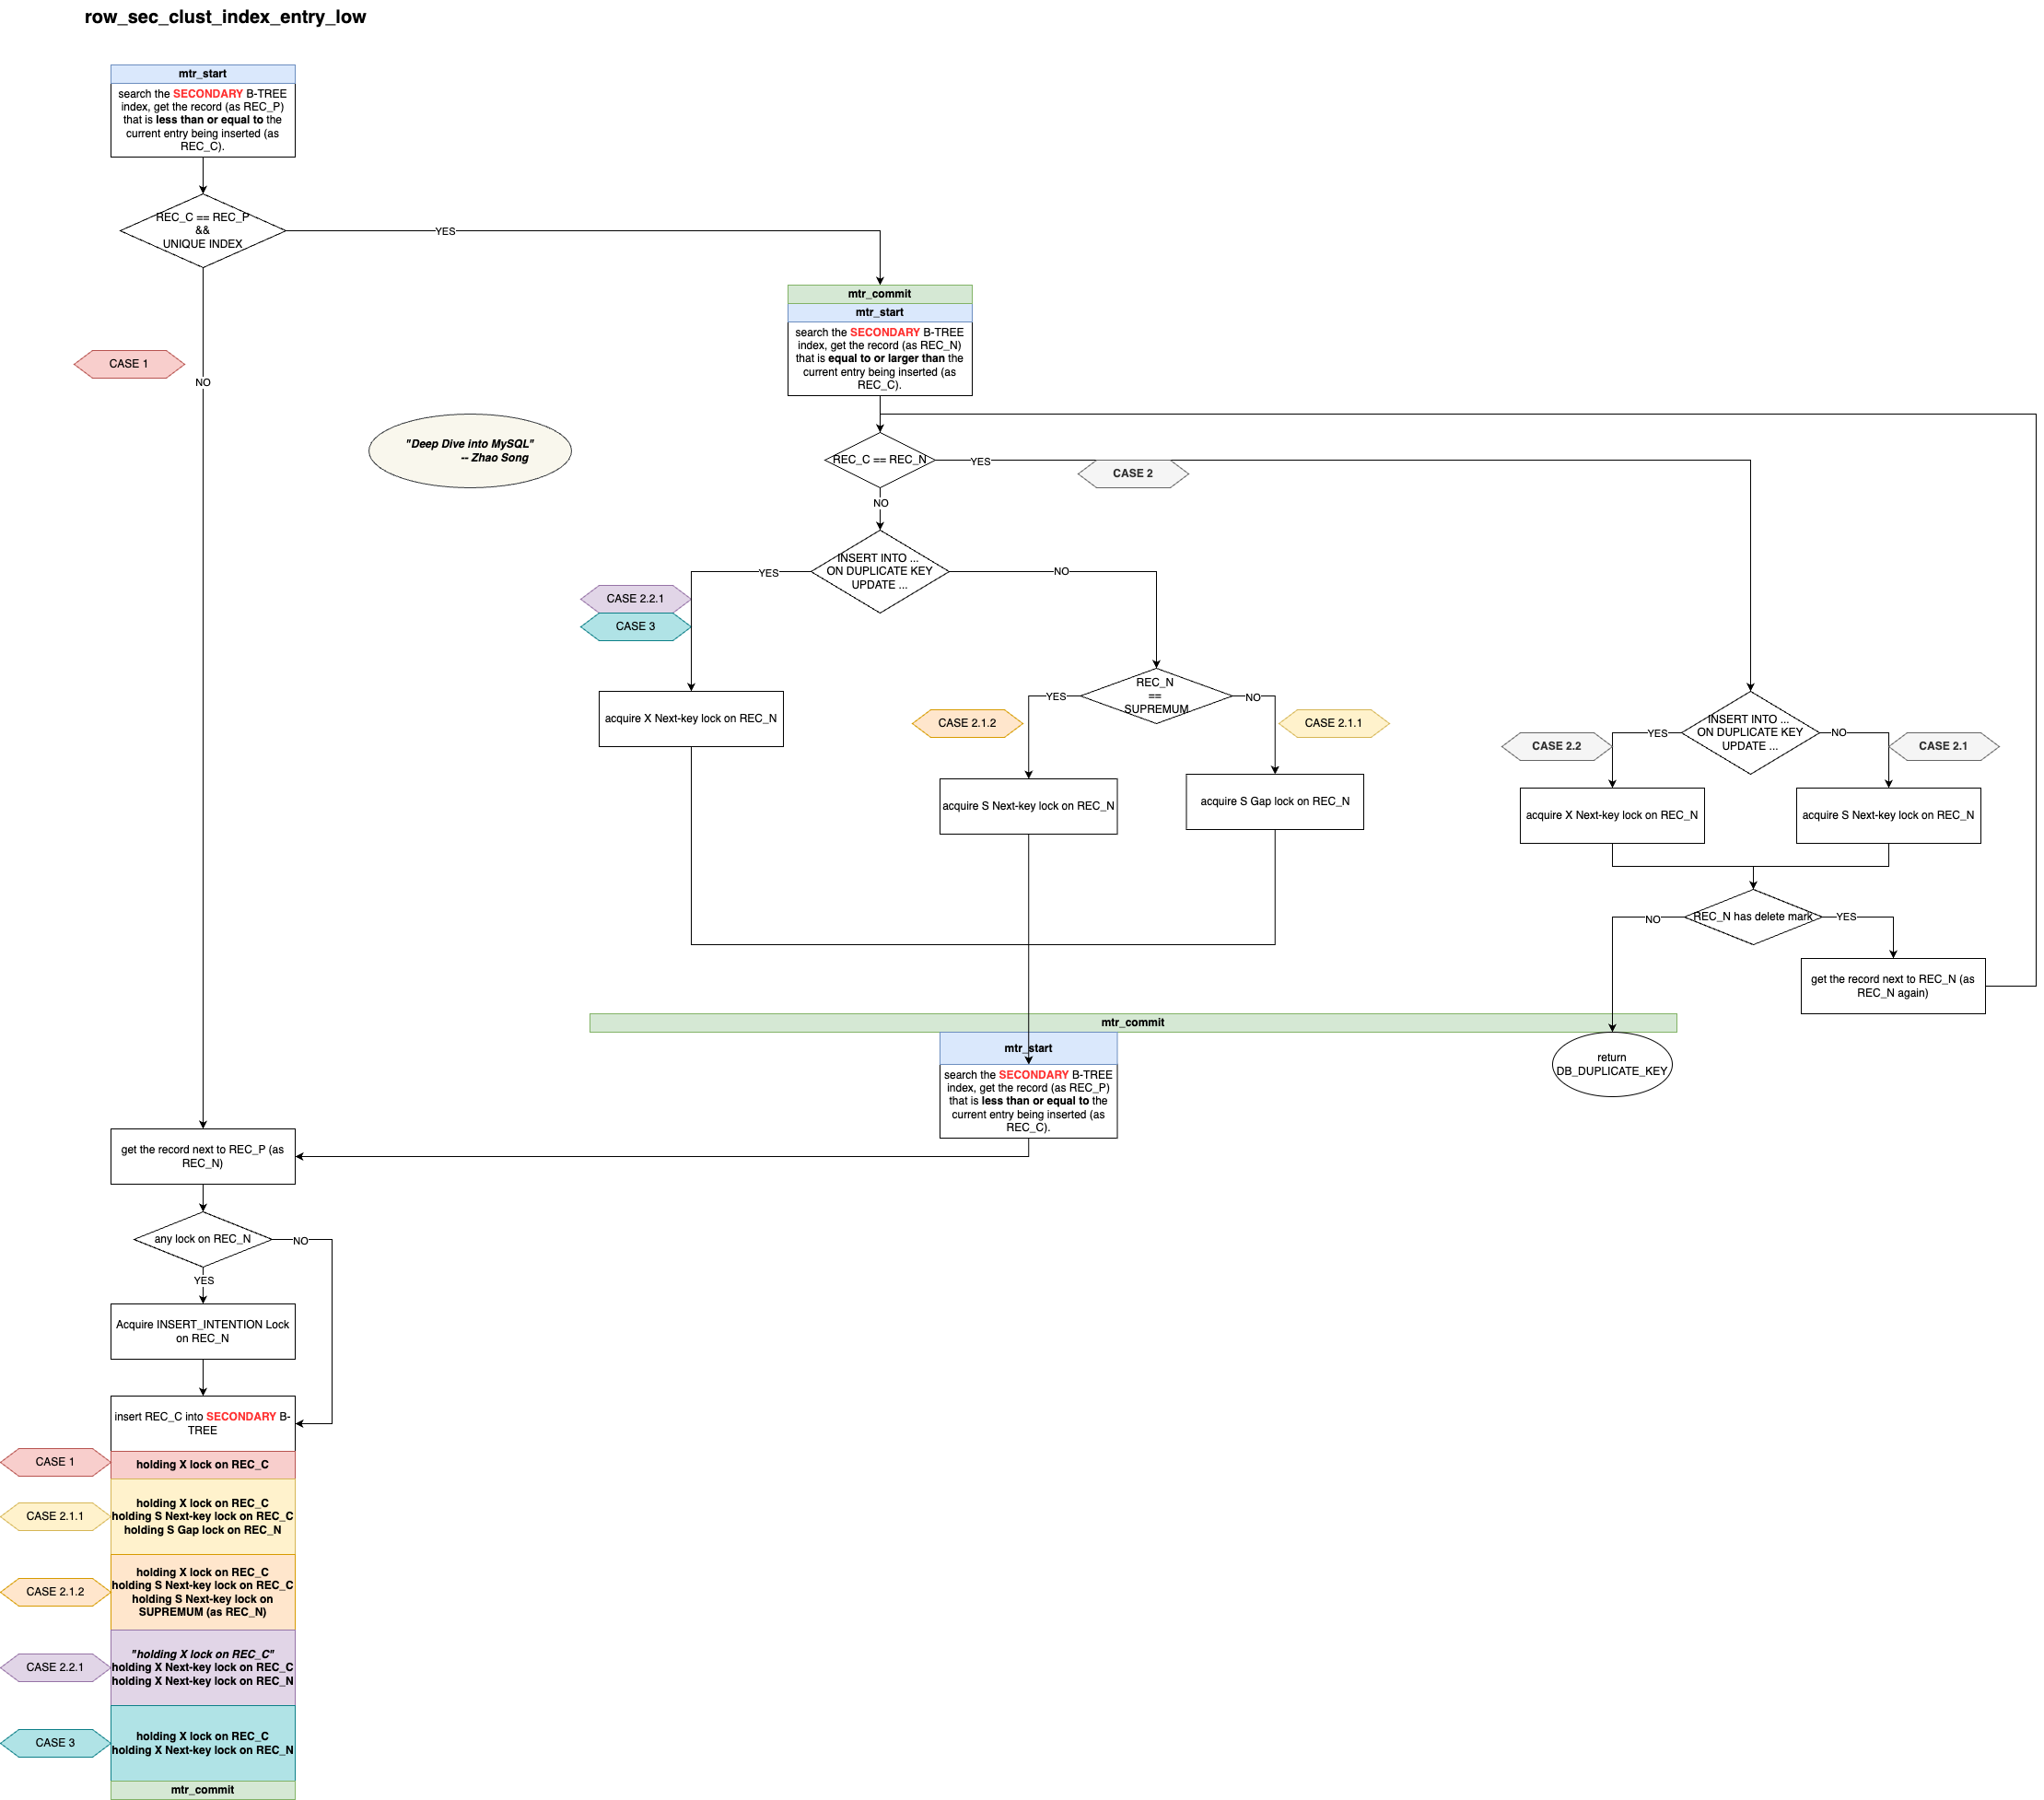
The following is a detailed explanation of the images, describing the operation of inserting an entry.
For the primary key index:
-
First, search the primary B-Tree, acquire the relevant page latch, and locate the record at the insertion position (record ≤ entry).
-
If the entry to be inserted already exists (i.e., entry == record), proceed with the following checks:
-
a. If it is an
INSERT ON DUPLICATE KEY UPDATE, apply an X lock on the record.b. If it is a regular
INSERT, apply an S lock on the record. -
Next, check if the record is marked as deleted:
a. If it is not marked as deleted, this means there is indeed a duplicate. Call
mtr_commit()to release the page latch and returnDB_DUPLICATE_KEYto the upper layer. Then, the upper layer will decide whether to continue with an update operation (ifINSERT ON DUPLICATE KEY UPDATE) or return a duplicate key error to the user (if a regular INSERT).b. If it is marked as deleted, it means there is no actual duplicate, so proceed further.
-
-
Check whether the next record (next to the current record) has any locks. If there are locks, apply an insert intention lock and ensure there are no Gap locks or Next-key locks from other transactions protecting the range where the entry will be inserted.
-
Insert the entry.
-
Release the page latch, but the lock is still held.
Note: Depending on different conditions, the held locks will vary. In some cases, only the X lock on the corresponding record is held, while in other cases, the S lock may also be held. This is marked as CASE 1, 2, and 3 in the diagram.
For secondary indexes:
-
First, search the B-Tree, acquire the relevant page latch, and locate the record at the insertion position (record ≤ entry).
-
If the entry to be inserted already exists (i.e., entry == record) and the current index is unique:
-
First, call
mtr_commit()to release the page latch acquired in the previous step, then search the B-Tree again, acquire the relevant page latch, and locate the first record that is ≥ entry. Note that the page latch is released in the middle, so the record located on the second search may differ from the first (due to modifications by other concurrent transactions). Hence, we need to check the following: -
Check if the record and entry are equal:
-
If they are equal:
-
Is it an
INSERT ON DUPLICATE KEY UPDATE?- If yes, apply an X Next-key lock on the record.
- If it’s a regular
INSERT, apply an X lock.
-
Then, check if the record is marked as deleted:
- If not marked as deleted, it indicates a duplicate. Call
mtr_commit()to release the page latch and returnDB_DUPLICATE_KEYto the upper layer. - If marked as deleted, it means there is no actual duplicate. Retrieve the next record and return to step 2.2 to continue the process.
- If not marked as deleted, it indicates a duplicate. Call
-
-
If they are not equal:
- Is it an
INSERT ON DUPLICATE KEY UPDATE?- If yes, apply an X Next-key lock on the record.
- If it’s a regular
INSERT, apply an S Gap lock (if the record isSUPREMUM, apply an S Next-key lock instead).
- Call
mtr_commit()to release the page latch, then search the B-Tree again, acquire the relevant page latch, and locate the record at the insertion position (record ≤ entry). Similar to step 2.1, the page latch is released and the record is re-located, but this time, even after the latch is released, the record remains protected by the lock, so it won’t be modified by other transactions.
- Is it an
-
-
-
Check whether the next record has any locks. If there are locks, apply an insert intention lock and ensure there are no Gap locks or Next-key locks from other transactions protecting the range where the entry will be inserted.
-
Insert the entry.
-
Release the page latch, but the lock is still held.
Note: The locking situation here is quite complex. Depending on different conditions, the locks held at this point vary. This is marked as CASE 1, 2.1.1, 2.1.2, 2.2.1, 2.2.2, and 3 in the diagram.
3.2 Implicit Locks
Another important point is that Insert operations usually do not explicitly lock records. Instead, each inserted record automatically holds an implicit lock. This is detected through the hidden trx_id field of the record. For the primary key index, if the record to be inserted is found in the B-Tree, it’s enough to compare the existing record’s trx_id. If the transaction corresponding to this trx_id is still active, it means the transaction that inserted the record hasn’t been committed yet, implying that the record holds an implicit lock. At this point, the system will convert the implicit lock to an explicit lock and place it in the lock_sys and wait. This optimization minimizes operations on the lock_sys to improve performance.
For secondary indexes, implicit lock detection is not as straightforward because secondary index records don’t store trx_id. Instead, the system compares the max_trx_id on the page containing the record with the smallest active trx_id in the transaction list. If the max_trx_id is smaller, it means all transactions that modified the page have been committed, so there’s no implicit lock on the record. If it’s greater or equal, the system must trace back to the corresponding primary key record and traverse the undo history to confirm if there is an implicit lock. This process is implemented in row_vers_impl_x_locked_low(), which is a complicated logic that I will summarize in a separate article.
4. Performance Issues Introduced by the Current Implementation
From the previous discussion, we can see that for primary key index, the locks held after insertion are relatively simple—just the X lock on the inserted record. However, for secondary indexes, the locks are numerous and vary under different conditions. Additionally, secondary indexes may hold Next-key locks and Gap locks. A large lock range can impact concurrent read and write operations by other transactions within this range, affecting performance. For example:
CREATE TABLE tbl(
  col_a INT,
  col_b INT,
  col_c INT,
  PRIMARY KEY(col_a), UNIQUE INDEX(col_b)) ENGINE = InnoDB;

INSERT INTO tbl VALUES (1, 11, 1), (2, 22, 2), (3, 33, 3);
DELETE FROM tbl WHERE col_a = 2;
In the above SQL, a table tbl is created first, then three rows of data are inserted. Next, the record with col_a = 2 is deleted. At this point, the record (2, 22, 3) in the primary index and (22, 2) in the secondary index are both marked with a delete mark. If we pause undo purge to ensure these delete marks remain in the index, and then start a transaction with the following SQL:
BEGIN; /*start transaction */
INSERT INTO tbl VALUES (2, 22, 66);
Re-inserting the deleted record with col_a = 2 , col_b = 22 and col_b = 66, after executing the locking process described earlier, will hold many locks as depicted in CASE 2.1.1 of the diagram, specifically including:
Primary Key Index:
- X lock on (2, 22, 66)
Secondary Index:
- X lock on (22, 2)
- S Next-key lock on (22, 2)
- S Gap lock on (33, 3)
Here, we observe that two Gap locks are added to the secondary index. This means that until this transaction is committed, other transactions cannot hold any X locks to insert or modify records in the (11, 22] range or obtain any insert intention locks in the (22, 33) range. This situation is more severe under INSERT INTO ... ON DUPLICATE KEY UPDATE ..., as it holds X Next-key locks and blocks other transactions’ S locks.
I believe that for secondary indexes, there should be more detailed judgments made, as in some scenarios, it is not necessary to hold such extensive Gap locks.
That’s all for now. In the next article, I will discuss the locking process under Locking Reads (row_search_mvcc()).